GST Registration in Chennai
Register your business for GST in Chennai with expert guidance, ensuring quick approval, smooth compliance, and complete support for all your business tax needs.

What is GST & Why is it Important?
India's Goods and Services Tax (GST) is a unified tax system that came into effect on July 1, 2017, following the 101st Constitutional Amendment. This reform replaced multiple indirect taxes like excise duty, VAT, and service tax with a dual structure that includes:
- Central GST (CGST), State GST (SGST),
- Integrated GST (IGST) for inter-state transactions.
GST is a destination-based, value-added tax that allows businesses to claim input tax credit, reducing the cascading effect of "tax on tax" and simplifying the overall tax system.
Since its implementation, GST has become a significant source of government revenue. In the 2024–25 fiscal year, India's gross GST collections hit a record ₹22.08 lakh crore, marking a 9.4% year-on-year growth. The average monthly collection stood at ₹1.84 lakh crore, highlighting stronger compliance and a wider tax base.
Why is GST Registration Important in Chennai?
If you are running a business in Chennai and your turnover crosses the government’s prescribed limit (₹20 lakh for service providers and ₹40 lakh for goods suppliers), GST registration becomes mandatory. Beyond legal compliance, it provides several key advantages:
- Legal Recognition: GST registration gives your business an official identity under the GST system, boosting professionalism and trust among customers, suppliers, and government authorities.
- Input Tax Credit (ITC): Businesses can claim credit for GST paid on purchases such as raw materials, goods, or services, reducing overall tax liability and improving cash flow.
- Nationwide Market Access: A GSTIN allows your Chennai-based business to trade across India without worrying about multiple state taxes, opening new growth opportunities.
- Enhanced Credibility: In commercial hubs like T. Nagar, Guindy, and Parry’s Corner, GST-registered businesses are seen as more reliable, attracting customers, vendors, and banks.
- Issuing Valid Tax Invoices: Only GST-registered businesses can issue proper tax invoices, essential for B2B transactions, e-commerce platforms, and ITC claims.
- Access to Bigger Opportunities: GST registration enables participation in government tenders, collaborations with large corporations, and selling on online marketplaces like Amazon, Flipkart, and Meesho.
- Smooth Compliance & Avoiding Penalties: Registered businesses can easily file returns and manage taxes through the GST portal, which helps maintain compliance and avoid penalties for exceeding the turnover threshold without registration.
Note: In certain cases, registration is required even if your turnover is below the threshold, such as for interstate sales, e-commerce operators, or casual/temporary businesses.
Tip: If you transport goods within Tamil Nadu, generate an E-Way Bill when the consignment value exceeds ₹1,00,000 (₹50,000 for inter-state). Add this to your logistics SOPs to stay compliant and avoid penalties.
Purpose of GSTIN
A GSTIN (Goods and Services Tax Identification Number) is a unique 15-digit number issued to every business registered under GST.
Example: 33AAAAA0000A1Z5
Here’s what the 15 digits mean:
- First 2 digits (33): State code. For Tamil Nadu (Chennai), it’s 33.
- Next 10 characters (AAAAA0000A): PAN number of the business or entity.
- 13th digit (1): Entity number of the same PAN in the state.
- 14th digit (Z): Default letter “Z” used in all GSTINs.
- 15th digit (5): Checksum digit used to verify the GSTIN.
Uses of GSTIN:
- Filing GST returns
- Issuing GST-compliant invoices
- Paying GST taxes
Just like PAN is mandatory for income tax purposes, GSTIN is essential for indirect tax compliance in India.
Who Needs to Register for GST in Chennai?
In Tamil Nadu, including Chennai, the mandatory GST registration thresholds are as follows:
- For Businesses supplying goods: If your aggregate annual turnover exceeds Rs. 40 lakhs, you must register for GST.
- For Businesses supplying services: If your aggregate annual turnover exceeds Rs. 20 lakhs, you must register for GST.
For example, a boutique in T. Nagar with an annual turnover of Rs. 45 lakhs from selling sarees would need to register, while a freelance graphic designer in Adyar with a turnover of Rs. 18 lakhs would not be required to.
Specific Cases Requiring Mandatory GST Registration Regardless of turnover, registration is mandatory for:
- Interstate suppliers of goods.
- Casual taxable persons and non-resident taxable persons.
- Businesses are required to pay tax under the Reverse Charge Mechanism (RCM).
- Businesses selling through an e-commerce aggregator, such as those on platforms that handle payment processing.
- E-commerce operators themselves.
- Input Service Distributors (ISD).
- Persons who supply online information and database access or retrieval services (OIDAR) from outside India to a person in India, other than a registered person.
- Persons who are required to deduct TDS (Tax Deducted at Source) under GST. This includes government departments, local authorities, and other notified entities that make payments under a contract exceeding a specified value.
- Persons who are required to collect TCS (Tax Collected at Source) under GST. This primarily refers to e-commerce operators who collect tax from sellers on their platform.
Who is Exempt from GST Registration in Chennai?
Not every business in Chennai has to register for GST. Some are exempt because of their turnover, type of business, or the goods and services they provide.
1. Small Businesses Below Turnover Limit
Small businesses with lower sales are not required to register for GST.
- Goods suppliers with an annual turnover of less than ₹40 lakh do not need GST registration.
- Service providers with an annual turnover of less than ₹20 lakh are also exempt.
Example: A small stationery shop in T. Nagar with yearly sales of ₹30 lakh doesn’t need GST.
2. Agricultural Producers
Farmers selling basic agricultural products are exempt from GST.
- Farmers selling unprocessed agricultural products do not need GST.
- Processed goods (e.g., packaged grains with branding) are taxable.
Example: A Chennai farmer selling fresh vegetables directly to local markets.
3. Certain Government Bodies and Non-Profit Organizations
Some government agencies and charitable organizations do not fall under the GST rules.
- Government offices, local authorities, and NGOs may be exempt.
Example: A charitable trust running free educational programs in Chennai.
4. Specific Goods and Services
Some goods and services are not covered under GST.
Alcohol for human consumption: The sale of alcoholic drinks is outside the GST system.
Exempted services: Certain services are also exempt, such as:
- Financial services: e.g., life insurance premiums
- Healthcare services: e.g., treatment provided by hospitals
- Educational services: e.g., tuition fees charged by schools or colleges
These exemptions ensure that essential services and specific products remain affordable for consumers.
5. Casual or Occasional Sellers (if turnover is below the threshold)
People who sell products only occasionally may not need GST.
- Sellers without a regular business setup are exempt if their turnover is below ₹20–40 lakh.
- If they participate in exhibitions, trade fairs, or temporary outlets, they must obtain casual taxable person registration, even if their turnover is below the threshold. The exemption applies only if they are not running a regular business.
Example: Someone selling handmade crafts during a festival in Chennai.
6. Voluntary Registration
Even if a business is exempt, registration can still be beneficial.
You can register voluntarily to claim Input Tax Credit (ITC), gain credibility, and sell on online marketplaces like Amazon, Flipkart, or Meesho.
What is the Step-by-Step Online GST Registration Process in Chennai?
You can get your GST registration in Chennai easily through the official GST portal. The system allows you to track your application with an Application Reference Number (ARN), and the certificate is usually issued within 7 days.
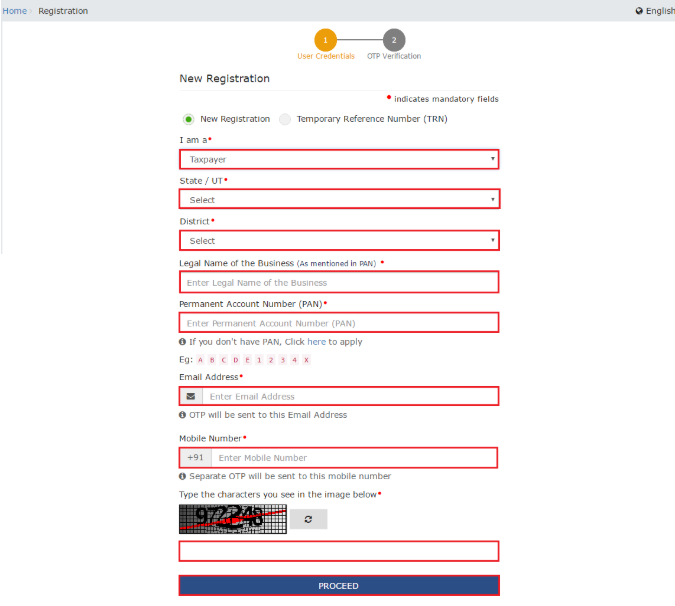
Step 1: Visit the GST Portal
Go to the GST Portal and navigate: Services → Registration → New Registration.

Step 2: Start New Registration & Generate TRN
On the registration page, choose New Registration. If you cannot finish the form in one go, you can continue later using your TRN.
- Select the Taxpayer type.
- Choose your State.
- Enter the legal name of the business as per the PAN database (details must match PAN).
- Enter the PAN of the business or proprietor. For companies/LLPs, enter the company/LLP PAN.
- Provide the email and mobile number of the Primary Authorized Signatory (to be verified next).
- Click PROCEED.
Note: The TRN is valid for 15 days from the date of generation.
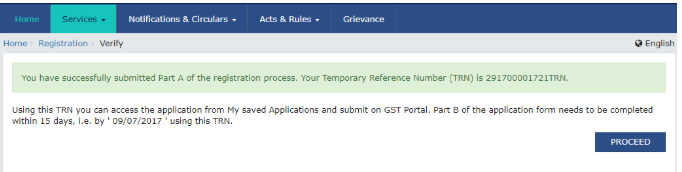
An ARN (Application Reference Number) acknowledgement is generated immediately after submission, but the GST certificate will be issued only after approval by the tax officer.
Step 3: OTP Verification
You’ll see the OTP verification screen (OTP is valid for 10 minutes).
- Enter the Mobile OTP.
- Enter the Email OTP.
Step 4: TRN Generation
After OTP verification, a Temporary Reference Number (TRN) is generated. You will use this TRN to fill out and submit the full application.
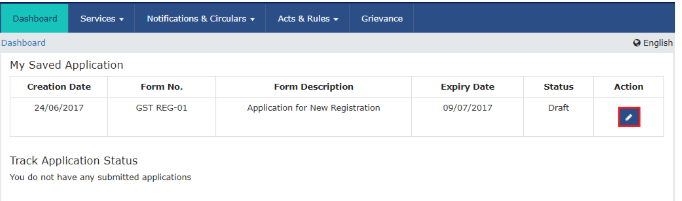
Step 5: Log in Using TRN
Enter your TRN and the captcha on the portal, then verify with the OTP sent to your email and mobile. Click the red-marked icon to start filling out the application.
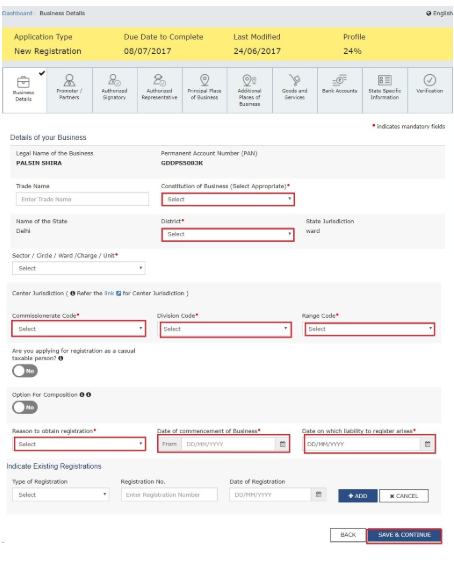
Step 6: Fill Business Details
Provide basic business information:
- Trade Name (if any).
- Constitution of Business (e.g., Proprietorship, Partnership, Company, LLP).
- District and Sector/Circle/Ward/Charge/Unit.
- Commissionerate, Division, and Range Codes (select from lists).
- Opt for the Composition Scheme if applicable.
- Date of commencement of business.
- Date on which liability to register arises (the day your turnover crossed the threshold). Apply within 30 days of this date.
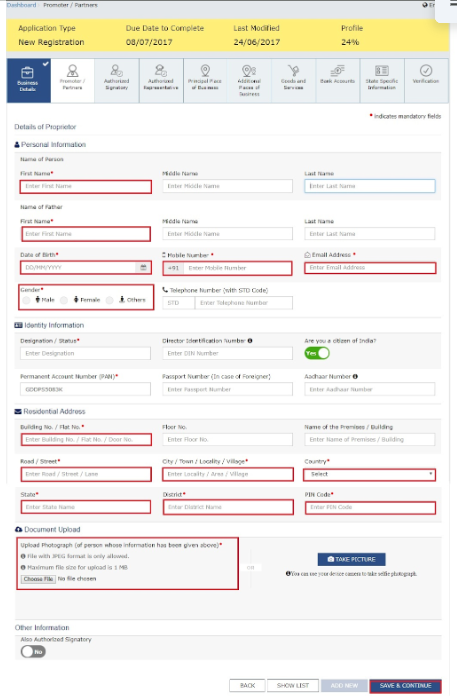
Step 7: Add Promoter/Partner Details
Enter details for the proprietor/partners/directors (up to 10 people):
- Personal info: name, DOB, address, mobile, email, gender.
- Designation of the person.
- DIN (only for Private/Public/PSU/Unlimited/Foreign Companies).
- Citizenship.
- PAN & Aadhaar.
- Residential address.
If Aadhaar is given, you can use Aadhaar e-sign for returns instead of a DSC.
Step 8: Add Authorized Signatory
Nominate an authorized signatory who will file GST returns and manage GST compliance. This person gets full access to the GST Portal and can act for the business.
Step 9: Principal Place of Business
Give details of your main business location in the state (usually the registered office for a company/LLP):
- Full address.
- Official contacts: email, phone (with STD), mobile, fax (with STD).
- Nature of possession (owned, rented/leased, consent/shared, etc.).
- If in an SEZ or an SEZ developer, upload the required SEZ approvals (choose “Others” under the nature of possession and upload).
Upload proof of occupancy: - Owned: Latest property tax receipt, municipal khata, or electricity bill.
- Rented/Leased: Rent/lease agreement + owner’s property tax/khata/electricity bill.
- Other/Shared/Consent: Consent letter + consenter’s khata/electricity bill.

Step 10: Additional Places of Business (if any)
If you operate from more than one location in the state, add each additional place of business with its address, contact details, and nature of possession. Upload supporting documents similar to the principal place.
Step 11: Goods & Services Details
Provide what you sell/provide:
- Select relevant HSN codes for goods and SAC codes for services.
- List the top goods/services supplied (as asked in the form).
Click here to find HSN and SAC codes.

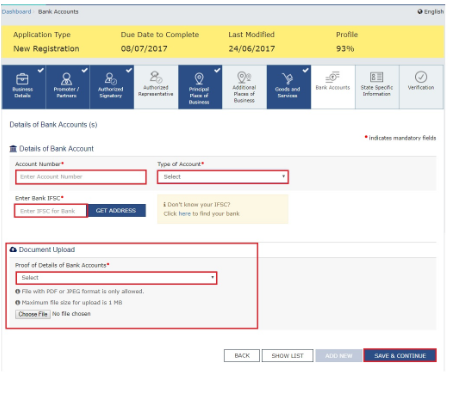
Step 12: Bank Account Details
Enter how many bank accounts you have for the business (e.g., 5 if you have five accounts). For each, provide:
- Account number
- IFSC
- Type of account
Upload a bank statement or a passbook copy as asked.
Step 13: Application Verification & Signing
Review all details carefully. Tick the verification checkbox.
- Choose the Name of Authorized Signatory from the dropdown.
- Enter the place of filing.
- Sign and submit using DSC, E-Sign, or EVC.
DSC is mandatory for Companies and LLPs.
Step 14: ARN Generation & Tracking
After successful signing, you’ll see a success message. You’ll also receive an acknowledgement on your registered email and mobile with the Application Reference Number (ARN). Use the ARN to track your application status.
Documents Required for GST Registration in Chennai (By Business Type)
Before applying for GST registration in Chennai, businesses must keep specific documents ready. The list of documents varies depending on the type of business entity.
| Business Type | Documents Required |
| Proprietorship | - PAN Card of the proprietor - Aadhaar Card of the proprietor - Passport-size Photograph - Proof of business address (Electricity Bill / Property Tax Receipt / Rent Agreement + Owner’s Proof / Consent Letter) - Bank details (Cancelled Cheque / Bank Statement / Passbook) |
| Partnership Firm / LLP | - PAN Card of Firm / LLP - Partnership Deed / LLP Agreement - Registration Certificate (if applicable) - PAN & Aadhaar of all partners/designated partners - Photographs of all partners - Business address proof (same as above) - Bank details - Authorized signatory details with consent letter |
| Private Limited / Public Limited Company | - Certificate of Incorporation (MCA) - PAN of Company - MOA & AOA - PAN & Aadhaar of all Directors - Photographs of Directors - Board Resolution / Authorization Letter for authorized signatory - Proof of business address - Bank details - DSC of one Director |
| Hindu Undivided Family (HUF) | - PAN of HUF - PAN & Aadhaar of Karta - Photograph of Karta - Business address proof - Bank account details |
| Trusts, Societies, Clubs, NGOs | - PAN of Trust / Society - Registration Certificate - PAN & Aadhaar of Trustees / Office Bearers - Photographs of Trustees / Office Bearers - Business address proof - Bank details - Authorization Letter for authorized signatory |
Costs and Fees Associated with GST Registration in Chennai
Before registering for GST in Chennai, it’s important to know the possible costs involved. While government registration is free, some additional expenses may apply depending on your business type and the help you hire.
| Category | Details |
| Government Fees | No government fees for GST registration on the official portal. |
| Professional Charges – Proprietorship Firms | Rs. 500 – Rs. 3,000 (varies by consultant/CA). |
| Professional Charges – Partnership Firms & LLPs | Rs. 1,000 – Rs. 5,000. |
| Professional Charges – Private Limited Companies | Rs. 4,000 – Rs. 10,000. |
| Penalty for Non-Registration | 10% of tax due (minimum Rs. 10,000). If deliberate evasion, the penalty can be 100% of the tax due. |
| Penalties for Non-Compliance | Late filing of GST returns may lead to fines and interest charges. |
| Amendment & Duplicate Certificate Fees | No government fees. Professional fees may apply if handled through consultants. |
GST Registration Offices & Contact Details in Chennai
These are the main GST offices in Chennai where businesses can register or get assistance regarding GST compliance.
| GST Office / Commissionerate | Address | Phone | |
| Chennai South Commissionerate | 692, MHU Complex, Anna Salai, Nandanam, Chennai – 600035 | 044-2433 0066 | sevakendramhu@gmail(dot)com |
| Chennai South Range-5 | E.V.R. Periyar Maligai, 6th Floor, 2054, Anna Salai, Nandanam, Chennai – 600035 | 044-2433 8302 / 03 | sevakendrapm@gmail(dot)com |
| Chennai North Commissionerate | Newry Towers, 12th Main Road, Anna Nagar, Chennai – 600040 | 044-2614 2852 / 2614 2853 | sevakendra-tn@gov(dot)in |
| Chennai Outer Commissionerate | Newry Towers, 2nd Avenue, 12th Main Road, Anna Nagar, Chennai – 600040 | 044-2614 2850 / 2614 2852 | sevakendra-outer-tn@gov(dot)in |
| Commercial Taxes Department, Tamil Nadu | Fanepet, Nandanam, Chennai – 600035 | 1800 202 1015 | helpdesk.ctd@tn(dot)gov(dot)in |
| Commercial Taxes Department, Ezhilagam, Chepauk | Ezhilagam Building, Chepauk, Chennai – 600005 | 044-2851 4250 | ctdpetition.ctd@tn(dot)gov(dot)in |
Connect with RegisterKaro and let our experts handle the legal hassle while you grow your business.
Frequently Asked Questions (FAQs)
What is GST Registration?
−GST Registration is the process by which a business gets officially recognized under the GST law and receives a unique GSTIN (Goods and Services Tax Identification Number).
Who needs to register for GST in Chennai?
+How can I apply for GST Registration in Chennai?
+What documents are required for GST Registration in Chennai?
+How long does GST Registration take in Chennai?
+Is GST Registration compulsory for small businesses in Chennai?
+What are the benefits of GST Registration for businesses in Chennai?
+Can I register my Chennai business for GST online?
+How much does GST Registration cost in Chennai?
+What happens if I don’t register for GST when required in Chennai?
+
Reviewed by
Joel DsouzaJoel Dsouza is a Chartered Accountant (CA) and compliance expert with over 7 years of hands-on experience in company registration, tax structuring, GST, ROC filings, and MCA compliance. As a qualified member of the Institute of Chartered Accountants of India (ICAI) and Co-Founder at RegisterKaro, he has personally advised more than 1,000 startups and SMEs across India, helping founders navigate incorporation, regulatory frameworks, and financial planning from Day 1. With deep expertise across all three levels of Finance and Portfolio Management, Joel is committed to promoting financial literacy and simplifying India's startup ecosystem through clear, actionable guidance that entrepreneurs can act on immediately.
Why Choose RegisterKaro as Your GST Registration Consultant in Chennai?
Registering your business under GST in Chennai is important for legal compliance, building trust, and expanding your business. RegisterKaro makes this process simple, fast, and hassle-free.
- Handle Your Entire Registration Online: You can register your business without visiting government offices. The entire process is handled online, saving you time and effort.
- Guidance from Tax Experts to Avoid Common Errors: Our team guides you through every step, from preparing documents to submitting your application correctly, reducing errors and delays.
- Avoid Penalties: GST registration is mandatory. We ensure timely filing and compliance, helping you avoid fines or legal issues.
- Support for All Business Types: Whether you are a sole proprietor, partnership firm, LLP, private limited company, NGO, or trust, we help you with the right process for your business type.
- Expand Your Business Across India: Once GST-registered, your business can trade legally across India. We help you get your GSTIN quickly, allowing you to reach more customers and clients.

What Our Clients Say
View AllJit
Register Karo is the best platform to register your company, @kajal chowhan helped me a lot, to make the process smoothly. Thank you team registerkaro
Guru
professional work, good team work by the team allocated to us, on time delivery for incorporation of my company, Ankit followed a good workflow throug... Read more
yayati
I reached out to registerkro for company windup. Would like to give shout out to Astha gupta who was extremly helpful throughout the process. Kudos to... Read more
Vijay Azad
Hi It was pleasure to contact you@alka for company registration .Happy with the dedication and support during process and working beyond timeline...
aravind raj
We did startup registeration with their team, it was point to point approach and they were clear in those procedures and their followup is too good...
vinay kumar
Your staff Ankita Matta is a polite person the way of handling the issues was good. I hope in future register karo team handle the issues in a same wa... Read more
Riya Singh
Register karo demonstrated professionalism and expertise in navigating complex legal and regulatory issues related to our industry. Special thanks Ank... Read more
ganesh patil
Had a great experience with Register Karo. The LLP registration process was handled smoothly and everything was explained clearly. Highly recommended!
Ayush
Really impressed with the service provided by Prayansh Jindal. He handled everything efficiently and ensured that all my queries were answered promptl... Read more
Sanjeev Rai
Register karo Helped me A lot in ICEGATE Registration Process, Highly satisfied with their Service , Kind and polite staff Overall Excellent Experienc... Read more
Related Blogs
View All
GST Registration for Export of Services in 2026: Conditions, LUT & Refund

GST for Consultancy Services in India 2026: Rates, SAC Codes & Compliance

How to Reply to GST Registration Notice 2026: REG-04, REG-18 & Format

GST for Software & IT Services in India 2026: Rate, SAC Codes & Exports

GST for Professional Services in India 2026: Limit, Rate & Process

GST for Freelancers in India 2026: Registration, Rates & RCM Guide

GST Compliance Calendar 2026-27: GST Return Due Dates, Forms & Deadlines

GST Amnesty Scheme in India: Penalty Waiver & Relief Guide

How to File Amendment in GST Registration in 2026?

Benefits of GST in India: Advantages & Disadvantages of GST