Add Additional Place of Business in GST
Add Additional Place of Business in GST (APOB) with ease. Expand your GST presence by adding new locations for Amazon, Flipkart, and warehouses with complete support from RegisterKaro.

What is APOB Registration in GST?
The full form of APOB is “Additional Place of Business”. When a business has more than one location where it stores goods, operates offices, or sells products (in addition to its main office), it must register those extra locations under GST. This process is called APOB Registration.
While commonly referred to as 'APOB Registration,' the official process is an 'amendment' to your existing GST profile. This guide will walk you through that amendment process.
For example, if your main office is in Delhi, but you also have a warehouse in Mumbai, you need to add that Mumbai address as your APOB in your GST registration. This helps the government keep track of all the places where your business operates.
What is ‘Place of Business’ under the GST Law?
A Place of Business under GST refers to any location where a business conducts its operations. As per Section 2(85) of the CGST Act, a Place of Business includes:
- A shop or showroom
- An office
- A warehouse or godown
- A factory
- Or any other place where you keep goods, send bills, or manage business
It also includes places where you store your products or where your books of accounts are kept.
PPOB vs APOB
Under GST law, every business must declare its business locations. These are divided into two types, PPOB (Principal Place of Business) and APOB (Additional Place of Business).
The PPOB is the main office, while APOBs are other locations like branches, warehouses, or storage units.
| Basis | PPOB | APOB |
| Meaning | Main place where the business operates | Other places (branches, warehouses, etc.) |
| Mandatory for GST Registration | Yes, it must be mentioned during GST registration | Optional, only if the business has more than one location in the same state |
| Purpose | Acts as the head office or main location | Supports the main business (e.g., storage, branch) |
| Number Allowed | Only one PPOB is allowed per state | Multiple APOBs can be added under one GSTIN |
| Example | A company’s main office in Delhi | Its warehouse in Mumbai or branch in Pune |
VPOB vs APOB for E-commerce Sellers
If you're selling on platforms like Amazon (FBA) or Flipkart, it's important to understand the difference between VPOB (Virtual Place of Business) and APOB (Additional Place of Business). Both are necessary for smooth GST compliance and operations, especially when you use third-party warehouses.
| Feature | VPOB (Virtual Place of Business) | APOB (Additional Place of Business) |
| Meaning | A virtual address used to get GST registration in a state | A real physical location (like a warehouse or office) used in addition to the main place |
| Use Case | Helps register in a state where the seller has no office | Required when storing goods at another location or warehouse |
| Physical Presence | Not needed | Needed (actual storage or business activity takes place) |
| Used By | E-commerce sellers expanding to other states | Any business with multiple real locations |
| Documents Provided By | VPOB service provider | Seller must provide valid proof of address |
| Required for Amazon/Flipkart? | Yes, if you don't have a warehouse in the state | Yes, if you use Amazon FBA/Flipkart warehouses |
How VPOB and APOB Work Together for Amazon FBA and Flipkart Sellers?
Many e-commerce sellers use both VPOB and APOB to meet GST rules. Here's how:
- VPOB (Virtual Place of Business) allows you to get GST registration in a new state without setting up a physical office. It provides the required legal documents like Rent Agreement, NOC, and utility bills.
- Once the GST registration is complete using the VPOB, you must add the actual Amazon or Flipkart warehouse address in that state as an APOB (Additional Place of Business) under your GST profile.
- This combination ensures full compliance, enables smooth stock movement, helps you claim Input Tax Credit (ITC), and prevents issues during GST audits or inspections.
Example: You sell from Delhi but use Amazon’s warehouse in Maharashtra.
- Get GST registration in Maharashtra using VPOB
- Then, add Amazon’s FBA warehouse as your APOB in that GSTIN.
Why is APOB Registration Important for Your Business?
As your business grows and starts operating from more than one place, like opening a new branch, office, warehouse, or shop, it’s important to update this information under GST.
1. Follows Legal Rules and Increases Transparency
If you’re running your business from multiple places, it’s necessary to register each location under GST. This ensures compliance and avoids potential penalties from tax authorities. When you register all your places, the GST department can easily track your business activities, which reduces the chances of any fines or penalties.
2. Helps in Smooth Daily Operations
With APOB registration, you can move goods between your locations easily without facing legal issues. It also makes your day-to-day operations smoother. Managing your stock becomes easier, and you can avoid problems like running out of goods or having too much stock in one place.
3. Makes Logistics and Inventory Management Easier
When your additional locations, like warehouses, are officially registered, you can store goods closer to your customers. This cuts down delivery time and saves transportation costs. It also helps you better plan your supply chain and restocking.
4. Supports Sales, Marketing & Customer Service
Having registered business places in different cities or regions helps you connect with more customers. You can also design local marketing strategies for each area. Being closer to customers improves delivery times and builds stronger customer relationships.
5. Helps in Business Expansion and Scaling Up
If you want to grow your business in new areas, APOB registration is a must. It legally allows you to work from multiple places and manage higher sales, production, or storage. This sets a strong base for your business to expand easily in the future.
6. Brings Tax Benefits and Better Financial Management
APOB registration allows you to properly claim Input Tax Credit (ITC) on purchases made at your additional locations, which can lower your overall tax liability. Keeping all your locations registered also makes GST filing easier and avoids penalties.
Who Needs to Add an “Additional Place of Business” in GST?
Any business that operates from more than one location (apart from its main office or shop) in the same state needs to add those places as APOB under GST.
- Businesses with Warehouses or Godowns: If you store goods in a separate warehouse or godown other than your main location, you must register that place as an APOB.
- Businesses with Multiple Branches or Shops: If you run more than one shop, office, or branch in the same state, each of them must be added as an APOB under your GSTIN.
- Online Sellers Using Third-Party Warehouses (like Amazon or Flipkart): If you're selling through platforms like Amazon or Flipkart and storing your products in their warehouses, you need to add those warehouse addresses as APOBs.
- Manufacturers with Separate Production Units: If your factory or production unit is located away from your main office, it must be registered as an APOB.
- Service Providers Working from Multiple Offices: If you offer services from more than one office in the same state, each location should be listed as an APOB.
Pre-requisites for APOB Amendment in GST
Before registering an Additional Place of Business (APOB) under GST, make sure you have the following things ready:
1. Active GST Registration
You must already be registered under GST. APOB can only be added to an existing GSTIN (GST number).
2. Proper Address Details
Make sure you have the full and correct address of the new location, including:
- Building/Shop Number
- Street Name
- Area
- District
- State and PIN Code
3. Ownership or Rental Proof
You must upload valid documents to show that you are using the place legally. These can include:
- Electricity bill or property tax receipt (if the place is owned).
- Rent agreement or lease agreement (if you’re renting).
- Consent letter or NOC (if you are using a friend or relative’s property).
4. No Pending GST Returns
Your GST returns (monthly/quarterly) must be up to date. The GST portal will not allow you to file an amendment if you have any pending GST returns.
5. Access to GST Portal
The amendment must be filed through the GST portal. Make sure you:
- Have login credentials
- Can receive OTP (One-Time Password)
- Have access to Digital Signature Certificate (DSC) or EVC if required.
How to Add “Additional Place of Business” on the GST Portal?
If your business is expanding to a new location, you need to update your GST registration by adding the additional place of business on the GST portal. This ensures proper compliance and avoids any legal issues.
Here’s a simple step-by-step process to add an “additional place of business” on the GST portal:
Step 1: Log in to the GST Portal
Go to the GST official website and log in using your username and password.
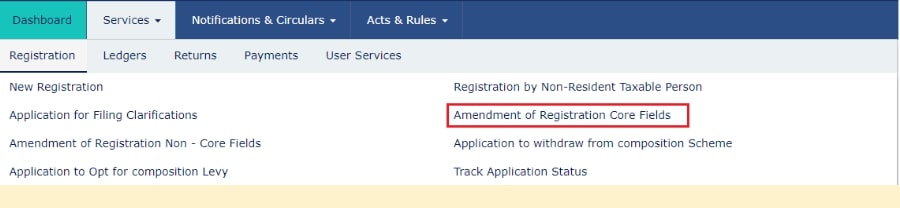
Step 2: Go to the Registration Section
After logging in, click on the ‘Services’ tab. Then select ‘Registration’, and from the options, click on ‘Amendment of Registration – Core Fields’.
Step 3: Select the 'Additional Place of Business' Tab
You will see different tabs to make changes. Click on the tab called ‘Additional Place of Business’ to update or add your new business location.
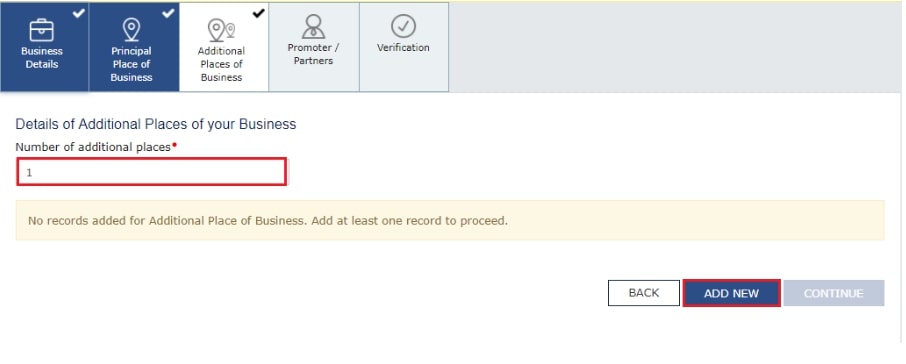
Step 4: View the Additional Place of Business Page
Clicking the 'Additional Place of Business' tab opens a new page where you can add or edit your locations.
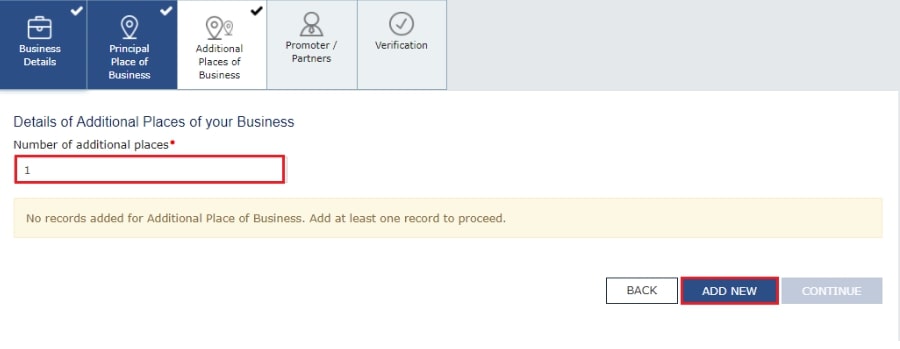
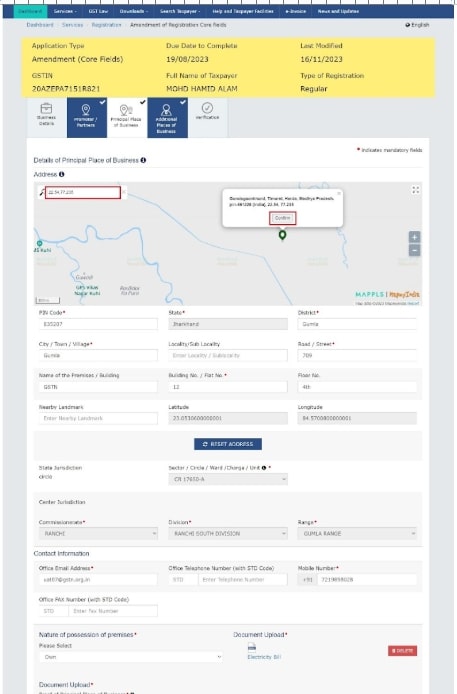
Click on the ‘Add New’ button and fill in all the required details. You also need to enter the reason for the amendment and the date of amendment. After entering the details, click on ‘Save. ’
In the address section, you can either type the full address, PIN code, or latitude and longitude (for example: 22.48, 77.89, 22,7). When you enter at least 2 characters, the system will show auto-suggestions in the “Enter Address or Latitude, Longitude” search box on the top right corner of the map.
Note: If your business doesn’t have any Additional Place of Business added yet, first go to the ‘Principal Place of Business’ tab. Then, select ‘Yes’ under the option ‘Have Additional Place of Business’ to add a new one.
You can also edit the existing address of an already added Additional Place of Business if needed.
Step 5: Complete the Verification Process
Click on the ‘Verification’ option.
- Tick the checkbox to confirm the details.
- Choose the name of the authorised signatory from the drop-down menu.
- Enter the place (city or location) from where you're applying.
- Then, sign the application digitally using either DSC (Digital Signature Certificate) or EVC (Electronic Verification Code).

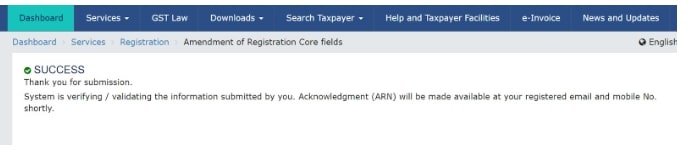
Step 6: Submit the Application and Wait for Approval
After you submit the application, a message saying ‘Successful submission’ will appear on your screen.
Within 15 minutes, you will get an acknowledgement on your registered email and mobile number.
Since this is a core field change, it needs to be approved by a GST officer. Once they review it, you will receive an SMS and email saying whether your request is approved or rejected.
Documents Required for Additional Place of Business in GST
To add a new business location under GST, you need to submit proper documents that prove your right to use the place, whether it’s owned, rented, or shared.
Proof of Address for Your New Business Location
When you add a new place under GST, you must give proper documents to show that you are using that place legally. These documents depend on whether the place is owned, rented, shared, or based on the type of business you have.
Below are the different types of address proofs you can use.
1. Documents for Owned Premises
If you own the property, you need to submit any one of the following:
- Property Tax Receipt
- Electricity Bill (not older than 3 months)
- Municipal Khata Copy
- Ownership Deed or Sale Deed
2. Documents for Rented or Leased Premises
If you're using a rented or leased space, provide:
- Rent Agreement or Lease Agreement (not older than 11 months if unregistered)
- NOC (No Objection Certificate) from the property owner (if required)
- Latest Utility Bill (Electricity, Water, etc.)
3. Documents for Consent-Based or Shared Premises
If you're using space in someone else’s property without rent:
- Consent Letter from the property owner
- NOC (optional but recommended)
- Supporting Document: Like the owner’s property tax receipt or electricity bill
4. Documents for Proprietorship Company
- Owner’s Aadhaar Card and PAN Card
- Address Proof of the additional place (based on the type—owned/rented/shared)
5. Documents for Partnership Company
- Partnership Deed
- PAN Card of the firm
- Address proof of the additional place
- Authorization Letter (if signed by a partner on behalf of the firm)
6. Documents for Private Limited Company
- Certificate of Incorporation
- PAN Card of the company
- Board Resolution or Authorization Letter
- Address proof of the new business place
- Director’s ID and address proof
Note: Board Resolution is not mandatory for DSC-based filing if the authorized signatory is a director whose name is already registered on the GST portal.
How to Remove or Delete an Additional Place of Business in GST?
If you want to remove an Additional Place of Business (APOB) from your GST registration, you can do it online through the GST portal. The process is simple and similar to adding a new place. You need to file a Core Field Amendment in your GST profile.
Here’s what you need to do:
- Login to the GST Portal – Go to www.gst.gov.in and log in with your credentials.
- Go to Services > Registration > Amendment of Core Fields.
- Click on ‘Additional Places of Business. ’
- From the list of your business locations, select the one you want to delete and mark it for removal.
- Submit the application using DSC or EVC.
Once your request is submitted, it will be reviewed by a GST officer. If everything is correct, the APOB will be removed from your registration.
The Risks of Not Registering APOB: Penalties for Non-Compliance
If you do not register your Additional Place of Business (APOB) under GST, it can lead to serious problems for your business.
1. Penalty for Non-Compliance
If the GST department finds out that you are operating from an unregistered place, they can impose a penalty of Rs. 10,000 or the amount of tax evaded, whichever is higher.
2. Input Tax Credit (ITC) Issues
You may lose your right to claim ITC on goods stored or sold from the unregistered place. This can increase your overall tax burden.
3. Seizure of Goods
Goods stored or moved from an unregistered location can be seized during inspection, and you may have to pay fines to get them released.
4. GST Registration Suspension
Your entire GST registration can be suspended or cancelled if found non-compliant during a GST audit or investigation.
5. Legal Trouble and Loss of Reputation
Non-compliance can lead to legal notices, audits, and damage to your business reputation, especially if you sell on platforms like Amazon or Flipkart.
Connect with RegisterKaro and let our experts handle the legal hassle while you grow your business.
Frequently Asked Questions (FAQs)
How many additional places of business can I add to my GST registration?
−There is no limit to the number of Additional Places of Business (APOB) you can add under one GSTIN. If you operate from multiple offices, branches, warehouses, or godowns within the same state, you can add each of them under the same GST registration. However, for different states, you need to apply for a separate GSTIN.
Is adding an APOB a core or non-core amendment?
+Why is the 'Add New' button disabled in the APOB section?
+Can I add an APOB in a different state under the same GSTIN?
+How long does it take for APOB approval?
+What documents are needed for a rented warehouse?
+Can I use a godown or warehouse as an APOB?
+What happens if I don't register my warehouse as an APOB?
+Do I need to upload documents for every APOB I add?
+Can I remove an APOB from my GST certificate?
+
Reviewed by
Joel DsouzaJoel Dsouza is a Chartered Accountant (CA) and compliance expert with over 7 years of hands-on experience in company registration, tax structuring, GST, ROC filings, and MCA compliance. As a qualified member of the Institute of Chartered Accountants of India (ICAI) and Co-Founder at RegisterKaro, he has personally advised more than 1,000 startups and SMEs across India, helping founders navigate incorporation, regulatory frameworks, and financial planning from Day 1. With deep expertise across all three levels of Finance and Portfolio Management, Joel is committed to promoting financial literacy and simplifying India's startup ecosystem through clear, actionable guidance that entrepreneurs can act on immediately.
Why Choose RegisterKaro for the APOB Registration Service?
When it comes to adding an “Additional Place of Business” under GST, RegisterKaro makes the process simple, quick, and stress-free. Here’s why you should choose us:
- Expert Guidance to Avoid Costly Mistakes: Our GST experts know all the rules and help you do everything correctly. This way, you avoid any errors or penalties that can happen if you miss something.
- Fast and Easy Process from Start to Finish: We handle the entire process for you—from document collection to filing. You don’t have to worry or run around. Everything is done smoothly and on time.
- Complete Transparency and Dedicated Support: We keep you updated at every step. Our support team is always there to answer your questions and guide you if you get stuck.
- Affordable Pricing for Businesses of All Sizes: Whether you have a small business or a big one, we offer budget-friendly plans that fit your needs without any hidden charges.

What Our Clients Say
View AllKesha Ram
Register Karo is a company carryout all task which you demand from Registeration process to final compliance of commencement of the new company. My e... Read more
Jit
Register Karo is the best platform to register your company, @kajal chowhan helped me a lot, to make the process smoothly. Thank you team registerkaro
Guru
professional work, good team work by the team allocated to us, on time delivery for incorporation of my company, Ankit followed a good workflow throug... Read more
yayati
I reached out to registerkro for company windup. Would like to give shout out to Astha gupta who was extremly helpful throughout the process. Kudos to... Read more
Vijay Azad
Hi It was pleasure to contact you@alka for company registration .Happy with the dedication and support during process and working beyond timeline...
aravind raj
We did startup registeration with their team, it was point to point approach and they were clear in those procedures and their followup is too good...
vinay kumar
Your staff Ankita Matta is a polite person the way of handling the issues was good. I hope in future register karo team handle the issues in a same wa... Read more
Riya Singh
Register karo demonstrated professionalism and expertise in navigating complex legal and regulatory issues related to our industry. Special thanks Ank... Read more
ganesh patil
Had a great experience with Register Karo. The LLP registration process was handled smoothly and everything was explained clearly. Highly recommended!
Ayush
Really impressed with the service provided by Prayansh Jindal. He handled everything efficiently and ensured that all my queries were answered promptl... Read more
Related Blogs
View All
10 Startup Compliance Mistakes Founders Must Avoid in 2026

Dormant Company vs Active Company: Difference & Comparison Table

RegisterKaro vs Vakilsearch: Compliance Platform Compared in 2026

How to Apply for GST Registration After Rejection in India

GST Notice Guide: Types, Reasons, Reply Format, and Penalties

RegisterKaro vs Local Consultant: Which Compliance Partner Should You Pick?

GST for Advertising & Digital Marketing Services 2026 Guide

GST Registration for Export of Services in 2026: Conditions, LUT & Refund

GST for Consultancy Services in India 2026: Rates, SAC Codes & Compliance

How to Reply to GST Registration Notice 2026: REG-04, REG-18 & Format