GST Registration Online in India
Register your business for GST with expert legal support for tax benefits, expansion across India, and compliance with government regulations.

GST Registration Made Simple – Watch Now
Confused about GST? This quick video breaks it down step-by-step—who needs it, how to apply, required documents, timelines, and common mistakes to avoid.
Thousands trust RegisterKaro for expert-led, hassle-free GST registration.
Watch now to get started with confidence. Need more help?

Overview of GST Registration in India
GST (Goods and Services Tax) Registration is a mandatory process for businesses engaged in the supply of goods or services crossing specific turnover thresholds. It applies to:
- Manufacturers
- Traders
- Service providers
- E-commerce sellers
- Freelancers, and
- Businesses operating online or across multiple states.
GST was launched with the main objective of combining various central and state taxes into one single tax on the supply of goods and services. Before GST, businesses had to deal with multiple taxes like VAT, excise duty, and service tax, making the system complicated.
What is GST Registration?
GST registration is the process by which a business or individual becomes registered under the Goods and Services Tax system. This process grants the entity a unique GSTIN (Goods and Services Tax Identification Number), which is required to conduct any taxable activity. It serves as proof that the entity is authorized to collect GST on behalf of the government.
In India, GST registration is essential for businesses to operate legally. It allows them to collect tax, avail input tax credit, expand business, and comply with regulations.
GST works on a value-added system, where tax is charged at each step of the supply chain—from manufacturer to retailer.
Types of GST Registration in India
GST registration in India varies based on the nature of the business and its turnover.
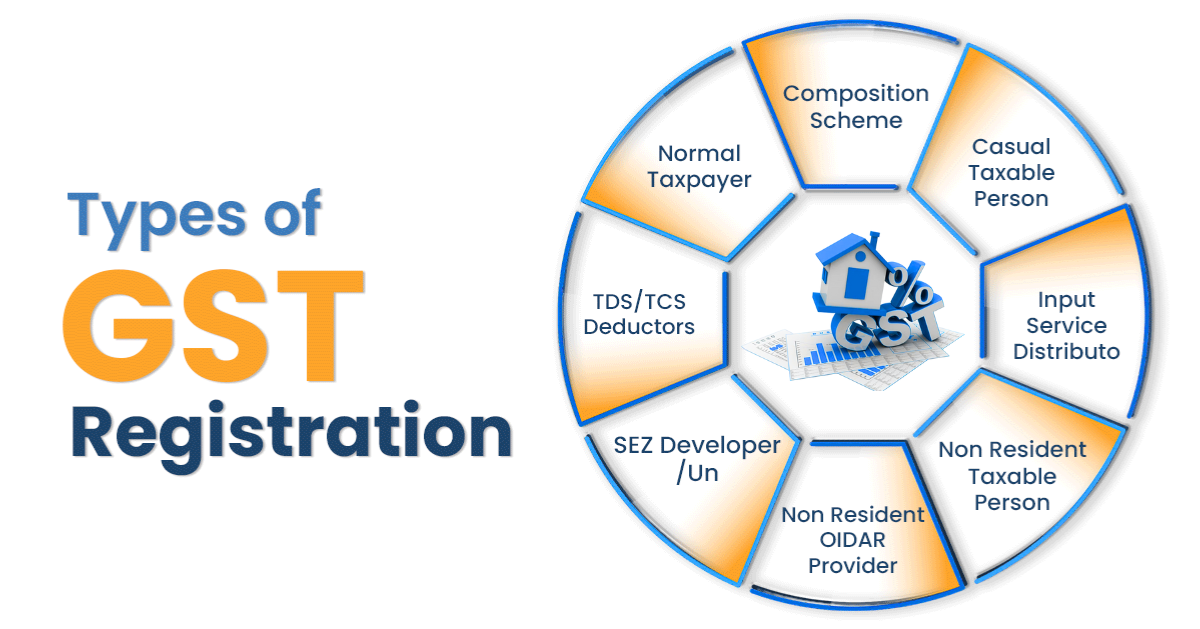
- Normal Taxpayer Registration: This is for regular businesses whose annual turnover exceeds the prescribed threshold. It allows businesses to collect GST, claim Input Tax Credit (ITC), and maintain standard compliance.
- Casual Taxable Person Registration: This GST type is for businesses with temporary or seasonal operations. It requires advance tax payments based on estimated turnover, with a validity of 90 days, extendable by another 90 days.
- Non-Resident Taxable Person Registration: For those supplying goods or services in India without a permanent business address.
- Non-Resident Online Service Distributor: For businesses offering online services (e.g., streaming platforms, software subscriptions) from outside India to Indian customers. Similar to non-resident taxable registration, it involves an advance tax payment and limited validity.
- Special Economic Zone (SEZ) Developer/Unit: This registration is for businesses operating in Special Economic Zones to promote international trade. It includes benefits like tax exemptions and rebates on exports.
- Tax Deductor at Source (TDS)/Tax Collector at Source (TCS): Government bodies or notified entities responsible for deducting or collecting tax at the source must register for GST. They are liable to collect and remit tax, ensuring compliance.
Components of GST: CGST, SGST, IGST, and UTGST
GST follows a dual structure because India is a federal country. This system allows both the Central and State governments to levy and collect taxes on transactions, ensuring a clear division of revenue.
This structure comprises four main components:
- CGST (Central GST): Collected by the Central Government on transactions that take place within the same state or Union Territory.
- SGST (State GST): Collected by the State Government on the same intra-state transactions. Both CGST and SGST are charged together and shared between the Centre and the State.
CGST and SGST are typically levied concurrently on the same transaction:
- IGST (Integrated Goods and Services Tax): This tax is applied to inter-state transactions (supplies of goods or services between different states) and on imports into India. IGST is collected by the Central Government.
- UTGST (Union Territory GST): UTGST is like SGST but applies to Union Territories without a legislature, such as Chandigarh, Lakshadweep, Andaman & Nicobar Islands, Daman & Diu, and Dadra & Nagar Haveli. It is charged on transactions happening within these territories.
GST Registration Threshold & Turnover Limits
GST registration is a mandatory requirement for businesses and individuals once their annual aggregate turnover crosses specific thresholds within a financial year.
- For Goods Suppliers: GST registration becomes mandatory if their annual turnover exceeds ₹40 lakh in most states.
- For Service Providers: The threshold for mandatory GST registration is ₹20 lakh in most states.
It is important to note that the GST Council increased the minimum turnover threshold for goods suppliers from ₹20 lakh to ₹40 lakh, aiming to provide relief to small businesses.
Special Category States: For certain designated states, the turnover thresholds are lower to account for their unique economic conditions. These states include:
- Arunachal Pradesh
- Assam
- Himachal Pradesh
- Jammu & Kashmir
- Manipur
- Meghalaya
- Mizoram
- Nagaland
- Puducherry
- Sikkim
- Tripura, and
- Uttarakhand
In short, the GST Registration thresholds vary based on states as follows:
| Type of Supply | Normal Category States Threshold (₹) | Special Category States Threshold (₹) |
| Goods | 40 Lakhs | 20 Lakhs |
| Services | 20 Lakhs | 10 Lakhs |
| Both Goods & Services | 20 Lakhs (for services component) | 10 Lakhs (for services component) |
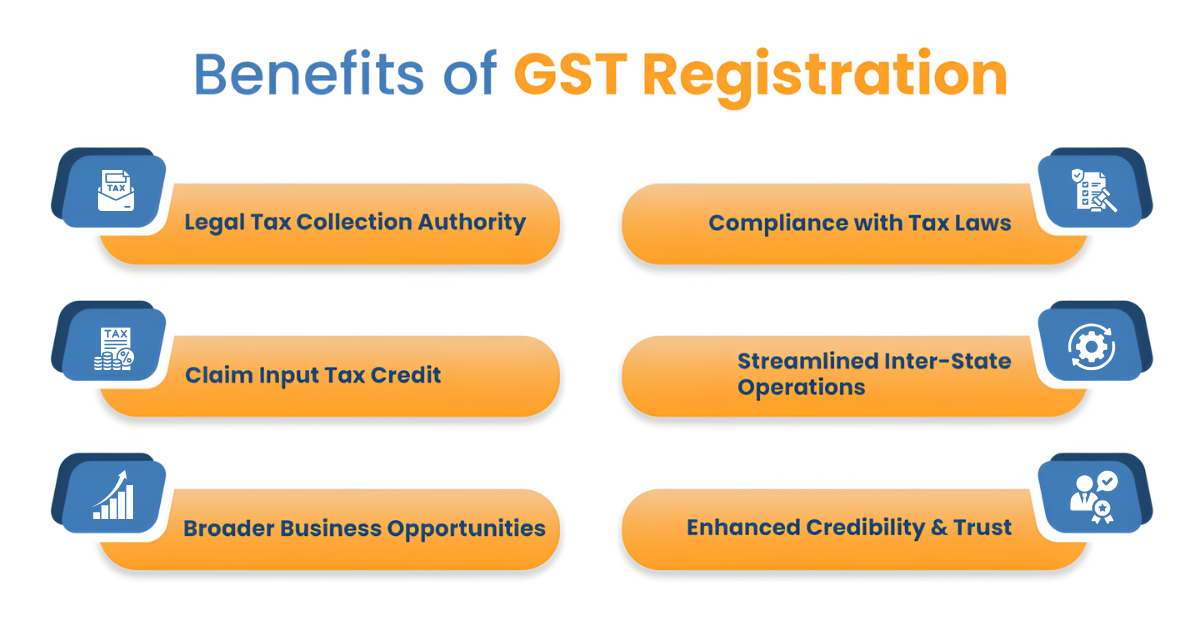
Key Benefits of Obtaining GST Registration in India
Here are some advantages of registering for GST:
-
Collect Tax Legally and Build Credibility
Certified Collection Rights: Registered businesses can legally collect GST from customers, promoting transparency and aiding government taxation. This legal approval ensures taxes are collected as per government rules, reducing the chances of errors or misuse.
Boosts Business Credibility: Issuing GST invoices after registration builds trust with clients and vendors, enhancing your company’s market image and GSTIN authenticity. This added credibility reassures stakeholders about the legitimacy and reliability of your business operations.
-
Claim Input Tax Credit
Reduced Tax Burden: Claiming credit on GST paid after GST Registration lowers your overall tax liability and improves cash flow efficiency.
Encourages Accurate Accounting: Promotes proper record-keeping for GST compliance and penalties, and ensures smoother audits and vendor interactions.
Simplifies Compliance: Integrates GST credit claims with statutory norms for hassle-free adherence. This alignment simplifies tax computations by matching exact legal requirements.
-
Wider Business Opportunities
Eligibility for Contracts: GST Registration benefits also include access to government tenders and B2B contracts, opening new avenues for growth. This eligibility not only enhances credibility but also provides a platform for strategic partnerships.
Improved Market Reach: Enhances customer trust and enables interstate and online business without restrictions after checking your registration status. Expanding your market reach facilitates greater business visibility and opens doors to diverse customer segments.
-
Compliance with Legal Requirements
Avoids Legal Penalties: Being GST-compliant ensures adherence to tax laws, protecting your business from GST compliance and penalties.
Supports Seamless Audits: Regular filings and reports linked to your GSTIN make audits easier and enhance your company's legal standing.
Strengthens Business Reputation: Accurate GST compliance enhances your business's reputation by demonstrating reliable financial practices. It builds stakeholder confidence and bolsters your credibility in the market.
-
Easier Business Expansion
Operate Across States: GST Registration allows smooth interstate operations by eliminating state-wise tax barriers for registered businesses. This unified framework simplifies logistics and ensures the efficient movement of goods across state borders.
Enables Online Selling: Facilitates nationwide e-commerce through platforms like Amazon and Flipkart, provided key documents are submitted correctly. This streamlined process boosts your online sales potential and enhances your brand's visibility across digital marketplaces.
Who is Eligible for GST Registration?
GST registration is mandatory or advisable for a wide range of businesses and individuals involved in the supply of goods or services in India. You are eligible (and in some cases, required) to register under GST if:
- Your aggregate turnover exceeds the threshold limit of ₹40 lakh for goods suppliers and ₹20 lakh for service providers (₹10 lakh for NE and hill states).
- You are involved in interstate supply of goods or services, regardless of turnover.
- You are an e-commerce seller or aggregator using platforms like Amazon, Flipkart, or Swiggy.
- You are a casual taxable person (e.g., someone supplying goods/services occasionally in a different state).
- You are a non-resident taxable person conducting business in India.
- You are liable under the reverse charge mechanism to pay GST on certain inward supplies.
- You are an input service distributor (ISD) or an agent of a supplier.
- You are providing online information or database access services (OIDAR) from outside India to Indian customers.
Voluntary registration is also allowed for small businesses below the threshold limit, helping them claim Input Tax Credit (ITC) and build credibility
Mandatory GST Registration for Specific Businesses
Beyond turnover thresholds, several specific business scenarios mandate GST registration:
- Casual Taxable Persons: Those who do business occasionally in a state where they don't have a fixed shop—for example, someone setting up a temporary stall at a trade fair.
- Non-Resident Taxable Persons (NRTPs): Foreign individuals or companies supplying goods or services in India without having a physical presence here.
- Inter-State Taxable Supplies: Anyone selling goods or services from one state to another must register for GST, even if their income is below the limit.
- E-commerce Operators & Sellers: Online platforms like Amazon or Flipkart and people selling through them must register for GST, no matter their turnover.
- Agents of a Registered Taxpayer: Anyone selling goods or services on behalf of a registered person needs to register, too.
- Tax Under Reverse Charge Mechanism (RCM): If you're required to pay GST instead of the supplier (reverse charge), you must register.
- Input Service Distributors (ISD): Businesses that pass on GST credits from the head office to branches must register as ISDs.
- TDS/TCS Deductors: Entities required to deduct or collect GST at source are mandatorily required to obtain GST registration.
- Overseas Online Information and Database Access or Retrieval (OIDAR) Service Providers: Foreign companies providing digital services (like software or online subscriptions) to people in India need to register.
- Aggregators: Platforms that connect customers to service providers (like Ola or Uber) must be registered.
- Businesses Registered Under Old Tax Laws: Those registered under VAT, Excise, or Service Tax had to switch to GST when it was introduced.
Voluntary GST Registration for Businesses
Even if a business does not meet the mandatory turnover threshold or fall into any of the specific mandatory categories, it has the option to register for GST voluntarily.
- Claim GST on Purchases (ITC): You can claim credit on GST paid for purchases as Input Tax Credit, helping you save money and improve cash flow.
- Build Trust & Credibility: A GST certificate gives your business legal recognition, making it easier to deal with bigger companies and partners who prefer GST-registered suppliers.
- Sell Across India: It allows you to do business across state borders without restrictions, helping you grow your market.
- Sell Online Easily: Most e-commerce platforms require GST registration, so getting it early helps avoid delays when you go online.
- Support Business Growth: It makes it easier to apply for tenders, scale operations, and stay compliant as your business grows.
- Use Old Tax Credits: If you have unused credits from previous tax systems, GST registration lets you carry them forward.
- Better for Loans & Rentals: Being GST-registered improves your reputation, which helps when applying for loans or renting office space.
Choosing the Right GST Scheme: Regular vs. Composition
For small business owners, choosing the appropriate GST scheme impacts tax liability, compliance burden, and business operations. The two primary schemes are:
-
The Regular Taxpayer Scheme
This scheme is mandatory for businesses whose annual aggregate turnover exceeds the prescribed thresholds (₹40 lakh for goods, ₹20 lakh for services in most states, and lower for special category states). Businesses that do not meet these thresholds can also opt for this scheme voluntarily.
The scheme is best suited for medium to large businesses, e-commerce operators, service providers, manufacturers, and B2B businesses. It is particularly advantageous for those involved in interstate trade or those seeking to maximize tax efficiency by leveraging ITC.
-
The Composition Scheme
Businesses can opt for the Composition Scheme if their annual aggregate turnover is up to ₹1.5 crore in most states. The turnover limit for GST registration in North-Eastern states and Himachal Pradesh is ₹75 lakh.
Businesses under this scheme pay GST at a reduced, fixed rate on their taxable turnover, rather than the standard GST rates.
- 1% for traders and manufacturers.
- 5% for restaurants not serving alcohol.
- 6% for other service providers.
The Composition Scheme is best for small businesses that mainly sell within their state to regular consumers (B2C) and want simpler tax rules and lower rates.
The following table distinguishes both the GST Schemes clearly:
| Criteria | Regular Scheme | Composition Scheme |
| Turnover Limit | Mandatory for turnover > ₹40L (goods) / ₹20L (services) in most states; no upper limit for voluntary opt-in | Up to ₹1.5 Cr (most states) / ₹75L (special category states) |
| Input Tax Credit (ITC) | Allowed to claim ITC on purchases | Not allowed to claim ITC on purchases |
| Tax Rates | Standard GST rates (5%, 12%, 18%, 28%) | Fixed lower rates (e.g., 1% for traders/manufacturers, 5% for restaurants, 6% for service providers) |
| Compliance Burden | High (multiple monthly/quarterly returns, detailed invoices, reconciliation) | Low (simple quarterly filings, less record-keeping) |
| Invoice Type | Can issue Tax Invoices | Must issue Bill of Supply (cannot charge tax from customers) |
| Inter-State Sales | Allowed without restrictions | Not Allowed (barred from interstate trade) |
| E-commerce Sales | Allowed | Not allowed to supply goods through e-commerce operators |
| Best Fit For | Medium/large businesses, B2B, interstate trade, e-commerce, maximizing tax efficiency | Small businesses, B2C, local trade, preference for simplified compliance |
Documents Required for GST Registration in India
Regardless of the specific business type, the following documents are mandatory for GST registration:
- PAN Card: Mandatory for all businesses as GSTIN is linked to the business’s PAN.
- Aadhaar Card: Required for verification in speeding up the process through Aadhaar authentication.
- Proof of Business Address: Needed to verify the main business location (owned, rented, or shared).
- Bank Account Details: Required to link GST with your business’s bank account.
- Passport-size Photos: Needed for identification of proprietors or authorized signatories.
- Digital Signature Certificate (DSC): Mandatory for companies and LLPs for online submission.
- Authorization Letter/Board Resolution: Gives authority to a person to handle GST matters for the business.
Note: The required documents can vary based on your business structure (e.g., a Partnership Firm requires a Partnership Deed, while an LLP needs its LLP Agreement). For a personalized checklist tailored to your business, consulting a professional is recommended.
Step-by-Step Guide to Online GST Registration Process
Businesses and individuals can complete the entire procedure through the official GST portal in the following manner:
Step 1: Generating Your Temporary Reference Number (TRN)
The first stage of GST registration involves generating a Temporary Reference Number (TRN), which acts as a temporary identifier for your application.
- Access the GST Portal: Begin by navigating to the official GST website: gst.gov.in.
- Initiate New Registration: On the homepage, click on the "Services" tab, then select "Registration," and finally choose the "New Registration" option.
- Fill Basic Details (Part A): On the registration page, select "Taxpayer", choose your State and District, enter your business name and PAN. Then add a valid email and mobile number, complete the Captcha, and click "PROCEED".
- OTP Verification and TRN Generation: You will receive separate One-Time Passwords (OTPs) on the provided mobile number and email address. Enter these OTPs for verification. Upon successful validation, a Temporary Reference Number (TRN) will be generated and displayed on your screen.
Step 2: Log in with TRN
Go to the GST portal, choose "New Registration" > "TRN", and log in using the OTP sent to your registered email and mobile.
Step 3: Access Saved Application
Click on "My Saved Application" and use the edit option to continue filling out Form GST REG-01.
Step 4: Fill in Business Details
Enter your trade name, business type, district, codes, and dates for business start and GST liability. Choose the Composition Scheme if eligible.
Step 5: Promoter/Partner Info
Add details of promoters/partners like name, PAN, Aadhaar, contact, and DIN (if applicable).
Step 6: Authorized Signatory
Provide details and documents for the person handling GST compliance on behalf of your business.
Step 7: Business Address
Enter your main business address, upload proof, and mention any additional business locations.
Step 8: Goods & Services
List the goods/services you deal in with their HSN/SAC codes.
Step 9: Bank Details
Submit your bank account number, IFSC, and upload a cancelled cheque or statement.
Step 10: State-Specific Info
Add any additional information required by your state, if applicable.
Step 11: Aadhaar Authentication
Choose to verify via Aadhaar for faster processing, or skip and undergo manual verification.
Step 12: Final Submission
Review all details, tick the declaration, and submit using DSC, e-Sign, or EVC as per your business type. Once you successfully submit your GST registration application, you’ll receive an Application Reference Number (ARN) as confirmation.
This unique 15-digit number is crucial for tracking the status of your application online and will be sent to your registered email address and mobile number.
GST Registration Timeline and Validity
The time taken for the GST registration process varies based on several factors
- With Aadhaar Authentication: Usually approved within 3–7 working days. If no action is taken by the officer in 7 days, it's auto-approved.
- Without Aadhaar Authentication: The process may take 21–30 days or more due to possible physical verification or additional document checks.
Factors Affecting GST Registration Timeline:
- Incomplete or Incorrect Info: Mistakes or missing details cause delays.
- Document Checks: Authorities verify all documents carefully.
- Business Type: Some entities may take longer (e.g., Casual Taxable Persons, DSC users).
- Government Load: High volumes can slow down processing.
- Delayed Response to Queries: Taking too long to respond to clarification requests from the GST officer can extend the timeline.
The validity of a GST registration certificate varies depending on the type of taxpayer:
- Regular Taxpayers: GST registration is permanent unless cancelled or surrendered; no renewal needed if compliance is maintained.
- Casual Taxable Persons: Registration is temporary and valid for 90 days, which is extendable by another 90 days.
- Non-Resident Taxable Persons: Registration is valid for the period mentioned in the certificate or as per the GST payment duration, whichever is shorter.
GST Registration Fees and Penalties
The registration fees may vary depending on different scenarios:
- Most Regular Businesses: There is no government fee for GST registration. No additional requirements apply.
- Casual Taxable Persons: While registration itself is free, applicants must submit a security deposit ranging from ₹500 to ₹10,000, depending on the nature of the business and state-specific rules.
- Non-Resident Taxable Persons: Registration is also free, but a mandatory security deposit between ₹500 and ₹10,000 is required. This applies to temporary or foreign business entities operating in India.
So, if a business crosses the GST threshold and fails to register, it can face heavy penalties along with interest on unpaid tax.
- General Penalty: ₹10,000 or 10% of the tax due — whichever is higher.
- In Case of Fraud/Deliberate Evasion: ₹10,000 or 100% of the tax due — whichever is higher.
GST Registration Renewal & Cancellation
For regular taxpayers, GST registration generally has no expiry date, and therefore, no separate renewal process or fees are required. Their GSTIN remains valid indefinitely, provided they regularly meet compliance requirements like timely return filing and tax payment.
This continuous compliance effectively serves as the "renewal" for regular taxpayers.
The following factors need to be considered as well:
- For Casual Taxable Persons and Non-Resident Taxable Persons (NRTPs), GST registration is temporary and has a limited validity period (typically 90 days or a specified period).
- These categories may require an extension or fresh registration if they continue their taxable activities beyond the initial validity period.
GST registration can be cancelled either voluntarily by the taxpayer or initiated by a GST officer due to non-compliance or other valid reasons.
The reasons for cancellation are likewise:
-
Voluntary Cancellation (by Taxpayer):
- Discontinuance or closure of the business.
- Transfer of business due to amalgamation, merger, de-merger, sale, lease, or other disposal (the transferee must get registered).
- Change in the constitution of the business leading to a change in PAN (e.g., proprietorship converting to a company).
- The annual aggregate turnover falls below the prescribed threshold limit for mandatory registration.
- Death of the sole proprietor.
- A business that voluntarily registered but did not commence business within six months of registration.
-
Cancellation by GST Officer (Suo Moto):
GST officers have the authority to cancel registration if they find non-compliance or fraudulent activities. Common reasons include:
- Failure to file GST returns for a specified continuous period (e.g., six periods for regular taxpayers, three quarters for composition dealers).
- Issuing invoices or bills without the actual supply of goods or services, or claiming Input Tax Credit fraudulently.
- Obtaining GST registration through fraud, willful misstatement, or suppression of facts.
- Not conducting any business from the declared place of business.
- Violating any provisions of the GST Act or Rules.
It is crucial to note that GST registrations cannot be cancelled without filing all pending returns. Only then can they apply for cancellation by submitting Form GSTR-10 (Final Return).
Here‘s how GST Registration can be cancelled:
- Step 1: Log in to the GST Portal: Visit www.gst.gov.in and log in with your user ID and password.
- Step 2: Navigate to Cancellation Application: Go to "Services" > "Registration" > "Application for Cancellation of Registration".
- Step 3: Fill Application Details (Form GST REG-16): The application form (GST REG-16) will be displayed. Fill in all the required fields and apply.
- Step 4: Verification and Approval: The tax officer will verify the application and supporting documents. If satisfied, the officer will issue an order for cancellation in Form GST REG-19 within 30 days of the application. The cancellation will be effective from the date determined by the officer.
- Step 5: File Final Return (GSTR-10): After the cancellation order is issued, the taxpayer must file a final GST return in Form GSTR-10 to clear any pending liabilities.
If the cancellation is initiated by the GST officer, a show-cause notice (Form GST REG-17) will be issued first, providing the taxpayer an opportunity to respond and explain why their registration should not be cancelled.
Post-Registration: GST Compliance and Return Filing
Adhering to GST regulations is crucial for smooth operations and to avoid legal consequences and penalties. GST compliance broadly includes key categories that businesses must diligently follow:
- Keep GST Info Updated: Update any business changes like address or activity on the GST portal.
- Maintain Records: Keep accurate books, invoices, and e-way bills for at least 6 years.
- Issue GST Invoices: Provide GST-compliant invoices with all required details for each sale.
- File GST Returns: Submit monthly, quarterly, and annual GST returns on time.
- Pay Collected GST: Deposit collected GST to the government promptly.
- Generate E-Way Bills: Required for goods movement over ₹50,000.
- HSN/SAC Codes: The correct application of HSN codes (for goods) and SAC codes (for services) on tax invoices and in GST return filings is mandatory.
All businesses registered under GST are generally mandated to file various GST returns, with the frequency (monthly, quarterly, or annually) depending on their turnover and the scheme they have opted for.
| Form Name | Applicable For | Frequency | Due Date | Purpose |
| GSTR-1 | All normal registered taxpayers (outward supplies) | Monthly/Quarterly (for QRMP scheme) | 11th of next month (monthly) / 13th of the month following quarter (quarterly) | To report details of outward supplies (sales) made during the tax period. |
| GSTR-2A/2B | Auto-drafted statement of inward supplies (purchases) | Monthly | Dynamic (2A) / 12th of next month (2B) | For viewing and reconciling input tax credit details based on suppliers' GSTR-1 filings. |
| GSTR-3B | All normal registered taxpayers (summary return) | Monthly/Quarterly (for QRMP scheme) | 20th of next month (monthly) / 22nd/24th of month following quarter (quarterly) | A summary return of outward supplies, inward supplies, ITC claimed, and tax liability, along with tax payments. |
| GSTR-4 | Composition scheme taxpayers | Quarterly | 18th of the month following the quarter | Quarterly return for composition dealers to declare their turnover and pay tax. |
| GSTR-9 | All normal registered taxpayers (annual return) | Annually | 31st December of the next financial year | An annual reconciliation of monthly/quarterly returns with audited annual accounts. Mandatory for turnover > ₹2 crore. |
| GSTR-10 | Taxpayers with cancelled GST registration | Once (Final Return) | Within 3 months of the cancellation order | A final return to clear any pending liabilities after GST registration cancellation. |
| GSTR-5 | Non-Resident Taxable Persons | Monthly | 20th of next month | Details of outward and inward supplies made by non-resident taxable persons. |
| GSTR-6 | Input Service Distributors (ISD) | Monthly | 13th of next month | Details of input tax credit received and distributed by an ISD. |
| GSTR-7 | Tax Deductors (TDS) | Monthly | 10th of next month | Details of tax deducted at source under GST provisions. |
| GSTR-8 | E-commerce Operators (TCS) | Monthly | 10th of next month | Details of supplies made through the e-commerce platform and tax collected at source. |
| GSTR-11 | Persons with Unique Identification Number (UIN) claiming a refund | Monthly | 28th of the month following the month for which the statement was filed | Details of inward supplies for UIN holders claiming refunds. |
GST Registration Certificate
A GST Registration Certificate is an official document issued by the GST Department upon successful registration of a business under the GST system in India. It serves as legal proof that your business is recognized and registered to collect and remit GST.
Key Details Included Under the GST Registration Certificate:
- GSTIN (Goods and Services Tax Identification Number)
- Legal Name and Trade Name of the Business
- Constitution of Business (Proprietorship, Partnership, etc.)
- Business Address
- Date of Registration
- Type of Registration (Regular, Composition, Casual, etc.)
How to Download Your GST Registration Certificate (Form GST REG-06)
Upon successful approval of your GST registration application, the GST authorities issue a certificate of registration in Form GST REG-06.
The physical copy is not provided by the authorities; it can only be downloaded from the GST Portal. To download your GST Registration Certificate:
- Step 1: Log in to the GST Portal: Visit gst.gov.in and log in using your valid credentials (username and password).
- Step 2: Navigate to Certificates: After logging in, click on "Services" > "User Services" > "View/Download Certificates".
- Step 3: Download: The screen will display all certificates issued by the GST authorities. Locate "Registration Certificate (Form GST REG-06)" and click the "Download" icon under the "Download" column.
- Step 4: Open and Print: The certificate will be downloaded in PDF format. You can then save it to your device or print a physical copy for your records.
Connect with RegisterKaro and let our experts handle the legal hassle while you grow your business.
Frequently Asked Questions (FAQs)
What is GST registration?
−GST registration is the process by which a business gets officially listed under the Goods and Services Tax system. Upon registration, the business receives a unique 15-digit GSTIN and becomes legally obligated to collect and remit GST on applicable transactions.
How to get GST registration?
+Who is eligible for GST registration?
+Who is liable for GST registration?
+What are the documents required for GST registration?
+How much time does GST registration take?
+How to download the GST registration certificate?
+How to check GST registration status?
+What is the threshold limit for GST registration?
+Is GST registration mandatory?
+How to change the address in the GST registration certificate?
+How to calculate aggregate turnover for GST registration?
+How to change the trade name in GST registration?
+Is GST registration required for share trading?
+How to change the phone number in GST registration?
+Is PAN mandatory for GST registration?
+What are the benefits of GST registration?
+What if the application for GST registration is rejected?
+How to add HSN code in GST registration?
+What is a letter of authorization for GST registration?
+How to change a partner's name in GST registration?
+Can I get multiple GST registrations within a state?
+What is a GST Identification Number or GSTIN?
+How to cancel GST registration?
+How to close GST registration?
+How to revoke a cancelled GST registration?
+Can I cancel GST registration without filing returns?
+
Reviewed by
Joel DsouzaJoel Dsouza is a Chartered Accountant (CA) and compliance expert with over 7 years of hands-on experience in company registration, tax structuring, GST, ROC filings, and MCA compliance. As a qualified member of the Institute of Chartered Accountants of India (ICAI) and Co-Founder at RegisterKaro, he has personally advised more than 1,000 startups and SMEs across India, helping founders navigate incorporation, regulatory frameworks, and financial planning from Day 1. With deep expertise across all three levels of Finance and Portfolio Management, Joel is committed to promoting financial literacy and simplifying India's startup ecosystem through clear, actionable guidance that entrepreneurs can act on immediately.
Why Choose RegisterKaro for GST Registration?
RegisterKaro simplifies your GST registration with expert-led guidance, fast processing, and complete compliance support, making it easy for your business to stay tax-ready.
- End-to-End Service Delivery: From documentation to GSTIN issuance, we manage the entire registration process for you.
- Expert Legal & Tax Professionals: Our experienced team ensures accurate filing and error-free compliance based on your business type.
- Transparent Process & Pricing: No hidden charges—just clear, upfront communication and predictable costs.
- Ongoing Compliance Support: Stay GST-compliant year-round with timely return filings, updates, and expert assistance.
- Trusted by 20,000+ Businesses: Our 98% success rate speaks for itself—startups, SMEs, and enterprises across India trust RegisterKaro.
Whether you're a startup, freelancer, or established business, we make getting your GSTIN fast, hassle-free, and fully compliant.

What Our Clients Say
View AllKesha Ram
Register Karo is a company carryout all task which you demand from Registeration process to final compliance of commencement of the new company. My e... Read more
Jit
Register Karo is the best platform to register your company, @kajal chowhan helped me a lot, to make the process smoothly. Thank you team registerkaro
Guru
professional work, good team work by the team allocated to us, on time delivery for incorporation of my company, Ankit followed a good workflow throug... Read more
yayati
I reached out to registerkro for company windup. Would like to give shout out to Astha gupta who was extremly helpful throughout the process. Kudos to... Read more
Vijay Azad
Hi It was pleasure to contact you@alka for company registration .Happy with the dedication and support during process and working beyond timeline...
aravind raj
We did startup registeration with their team, it was point to point approach and they were clear in those procedures and their followup is too good...
vinay kumar
Your staff Ankita Matta is a polite person the way of handling the issues was good. I hope in future register karo team handle the issues in a same wa... Read more
Riya Singh
Register karo demonstrated professionalism and expertise in navigating complex legal and regulatory issues related to our industry. Special thanks Ank... Read more
ganesh patil
Had a great experience with Register Karo. The LLP registration process was handled smoothly and everything was explained clearly. Highly recommended!
Amit Kumar
Ms Vandana Sharma has done awesome work for me from Registerkaro . She worked late night with me . I appreciate her for these type of effort . Thanks... Read more
GST Registration Across India
Related Blogs
View All
GST Amnesty Scheme in India: Penalty Waiver & Relief Guide

How to File Amendment in GST Registration in 2026?

Benefits of GST in India: Advantages & Disadvantages of GST

GST Reforms in India: Rate Changes, Slabs, and Key Impact
")
Cement HSN Code and GST Rate in India (2026 Update)

How to Check & Download E-Way Bill History Online in India?

Can One GST Number Be Used for Multiple Businesses?

E-Way Bill Login Portal: Registration & GST Login Guide

How to Change Mobile Number on GST Portal? Complete 2026 Guide

GST Registration Fees & Charges in India: Complete Guide
Featured In


